_1@2x.png)
How to embed a form for each entry in a View
You can embed a Gravity Forms form directly into a View. This lets users submit entries or interact with a form inside the Multiple Entries or Single Entry layout.
This guide covers:
- How to add the Gravity Forms field to your View
- How to configure the embedded form's fields for dynamic population
- How to pass entry data into the embedded form
- Troubleshooting common issues
Step 1: Add the Gravity Forms field to the View
To embed a form in your View:
- Click "Add Field"
- Choose "Gravity Forms" from the field list (under "GravityView Fields")
- Select which form to embed from the "Form to display" dropdown
- Configure display options:
- Show form title
- Show form description
- Enable AJAX submission

Step 2: Configure Dynamic Population in Your Form
Before you can pass values from the entry into the embedded form, you need to configure the form's fields to accept dynamic data.
For each field in your embedded form that you want to populate:
- Edit the form in Gravity Forms
- Click on the field you want to populate
- Go to the Advanced tab
- Check "Allow field to be populated dynamically"
- Set a Parameter Name (e.g., "user_email", "contact_name", "project_id")
ℹ️ The Parameter Name is the key you'll use in the next step. Make it descriptive and memorable!
Learn more: Using Dynamic Population in Gravity Forms
Step 3: Pass Entry Data to the Embedded Form
After inserting the Gravity Forms field, click its gear icon to open the field settings.
Understanding Field Value Parameters
The "Field Value Parameters" setting uses query string format to pass data:
parameter_name={Merge Tag}Where:
parameter_namematches the Parameter Name you set in Step 2{Merge Tag}is the data from the current entry you want to pass
Examples
Pass a single field value:
user_email={Email:3}This populates the field with parameter name "user_email" with the value from the Email field (ID 3) of the current entry.
Pass multiple field values:
user_email={Email:3}&contact_name={Name (First):1.3}&company={Company Name:5}Use & to separate multiple parameters (standard query string format).
Pass user information:
logged_in_email={user:user_email}&user_id={user:ID}Pass custom field values:
project_id={Project ID:10}&status={Status:12}Using the Merge Tag Selector
You can use the merge tag selector ({..} button) to browse available merge tags instead of typing them manually. Click the button to see all available fields from the current entry, user data, and other merge tags.
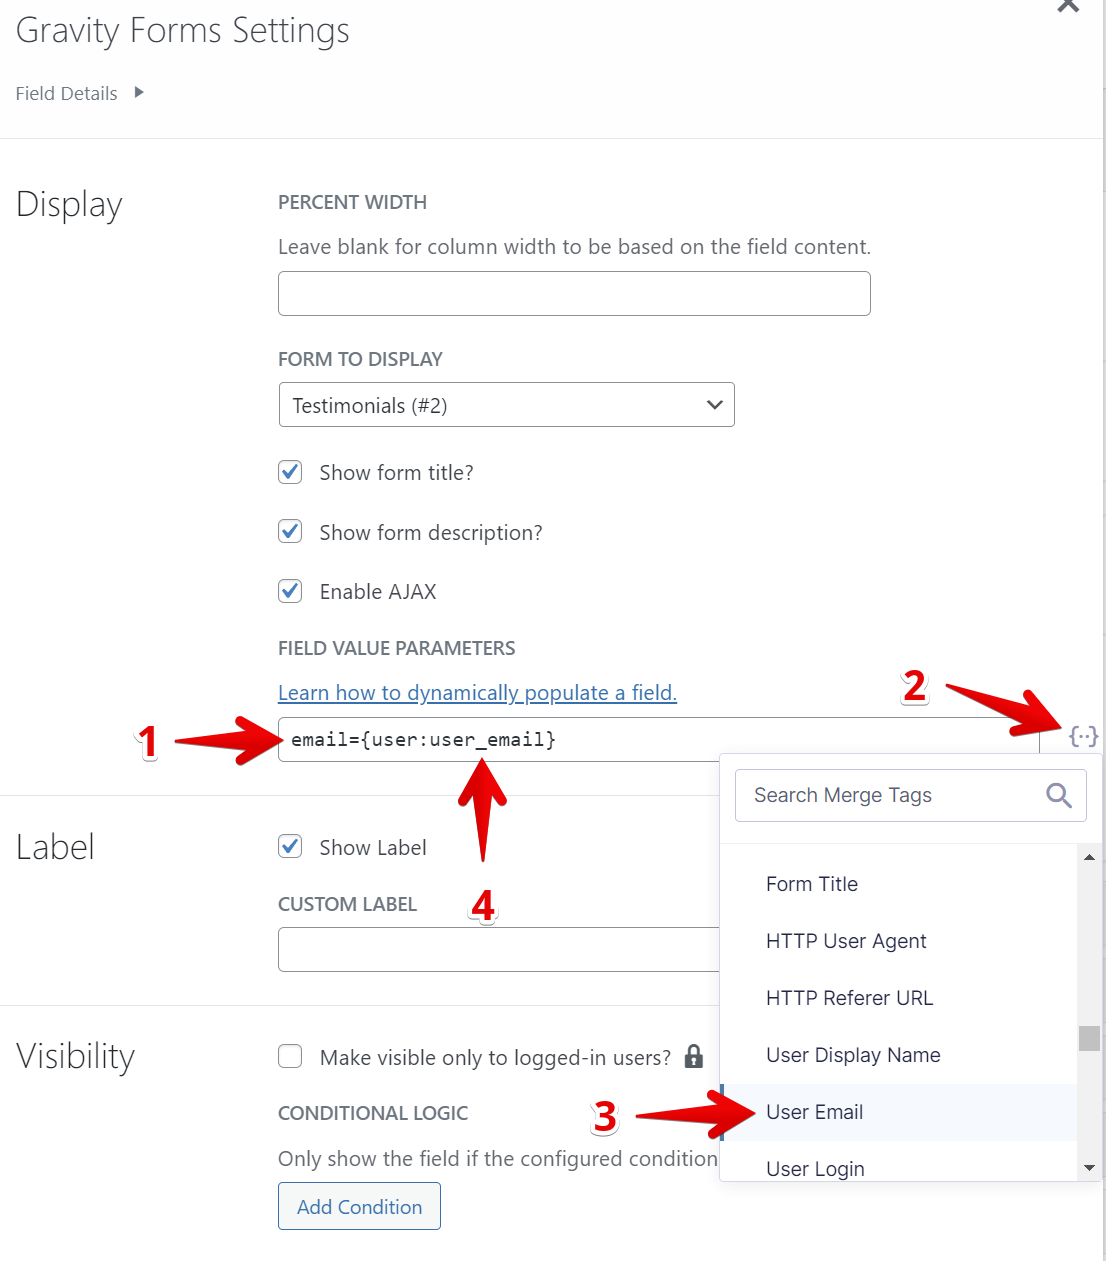
When you select a merge tag, it will be inserted into the Field Value Parameters field. Remember to add the parameter name before the merge tag (e.g., email={user:user_email}).
⚠️ Important: The parameter name in the Field Value Parameters setting must exactly match the Parameter Name you set in the embedded form's field settings. If they don't match, the field will remain empty.
Troubleshooting
Fields are empty even though I set Field Value Parameters
Most common cause: Parameter names don't match.
Check that:
- The parameter name in Field Value Parameters (e.g.,
user_email) exactly matches the Parameter Name in the embedded form's field settings - Parameter names are case-sensitive
- The field has "Allow field to be populated dynamically" checked
Merge tags show as literal text instead of values
Cause: Incorrect merge tag syntax.
Ensure you're using the correct format:
- Correct:
{Field Label:field_id}or{user:user_email} - Incorrect:
Field Label:field_id(missing curly braces)
Works in Single Entry but not Multiple Entries
Expected behavior: Entry-specific merge tags only work in Single Entry context.
In the Multiple Entries (directory) view, there's no "current entry" to pull data from. Entry merge tags like {Email:3} won't work.
User merge tags like {user:user_email} will work in both contexts since they reference the logged-in user, not the entry.
Form submits but doesn't create an entry
Check your form's settings:
- Ensure the form isn't restricted by conditional logic
- Check that required fields are being populated or filled out
- Look for JavaScript errors in the browser console
Note: Tracking Embedded Form Submissions
Forms embedded using the Gravity Forms field automatically include two entry meta values:
gk_parent_entry_id– connects the new entry to the current entrygk_parent_form_id– identifies the form used in the View
These meta values let you create relationships between entries and query related submissions.
Learn more: About the gk_parent_entry_id and gk_parent_form_id entry metas