_1@2x.png)
Configuring Delete Entry
When editing a View, go to the Settings box and click on "Delete Entry".
Check the "Allow User Delete" checkbox
This will add a "Delete" button next to the "Update" and "Cancel" buttons in the Edit Entry screen.
Note: even if this is unchecked, administrators will still be able to delete entries in the Edit Entry screen. See the screenshots below.
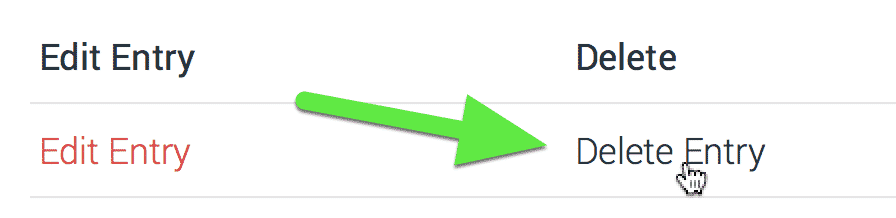
With Delete Entry enabled
Note: the button styles will depend on your theme.

Without Delete Entry enabled
Note: the button styles will depend on your theme.

You can add Delete Entry links in Multiple Entry Layout or Single Entry Layout as well
Allow users to delete an entry from any screen.
Click "Add Field" or "Add Table Column" to add the new Delete Entry field
Type "Delete" to search fields, or scroll down. Click Delete Entry to add the link to your layout
Click the gear icon to configure the settings
ℹ️ You can also double-click anywhere on the field to open field settings!
Configure the Delete Entry field settings
- Change the link text (default: Delete Entry)
- Change who can view the link - by default, the Entry Creator can view the link if "Allow User Delete" is enabled. You can change this so only users with more permissions can view the Delete Entry link.
- Whether to display a label for this field. In Table and DataTables layouts, the label is the column header text.
- Change the label of the field (Default: Delete Entry)
- Field Conditional Logic to show/hide the field based on other field values in the entry. Added by the Advanced Filtering extension
- Add custom CSS class to the field container (optional)
Click Update to save your View
The Delete Entry link should now be visible in your View!
FAQ
Why can a user can still see the Delete button even though I didn't enable it?
Administrators can always delete entries in the Edit Entry screen, regardless of the "Allow User Delete" setting. To hide the Delete button, ensure the test user doesn’t have administrative permissions, as admins have default access to this feature.
If the user has either the gravityforms_delete_entries , gravityview_delete_others_entries, gravityview_full_access , or gform_full_access capabilities, they will be able to see the Delete button.
To disable this functionality, you can use the gk/gravityview/delete-entry/show-delete-button filter (requires GravityView 2.48.4 or newer):
/**
 * Modify the visibility of the Delete button based on the View settings.
 *
 * By default, the Delete button is shown if the user has the `gravityforms_delete_entries` capability.
 * This filter makes it so that the Delete button is never shown if not enabled by the "Allow User Delete" View setting.
 *
 * @param boolean $show_delete_button Whether the Delete button should be shown. Default: true.
 * @param array $form The Gravity Forms form.
 * @param array $entry The Gravity Forms entry.
 * @param int $view_id The current View ID.
 * @param int $post_id The current Post ID. May be same as View ID.
 *
 * @return boolean Whether the Delete button should be shown.
 */
add_filter( 'gk/gravityview/delete-entry/show-delete-button', function( $show_delete_button, $form, $entry, $view_id, $post_id ) {
	$view = \GV\View::by_id( $view_id );

	if ( ! $view ) {
		return $show_delete_button;
	}

	$user_delete = $view->settings->get( 'user_delete' );

	// Only checks user_delete view option if view is already set
	if ( empty( $user_delete ) ) {
		return false;
	}

	return $show_delete_button;
}, 10, 5 );
Prior to GravityView 2.48.4, you can use gravityview/delete-entry/show-delete-button. It lacks any arguments, other than true/false whether to show the Delete button:
// Disable the delete button for all users on all Views.
add_filter( 'gravityview/delete-entry/show-delete-button', '__return_false' );