_1@2x.png)
How to trigger a GravityExport Save Feed
You can trigger a GravityExport Save feed in two ways: by scheduling it to run automatically at a set interval, or by calling a public trigger URL (webhook).
How to configure
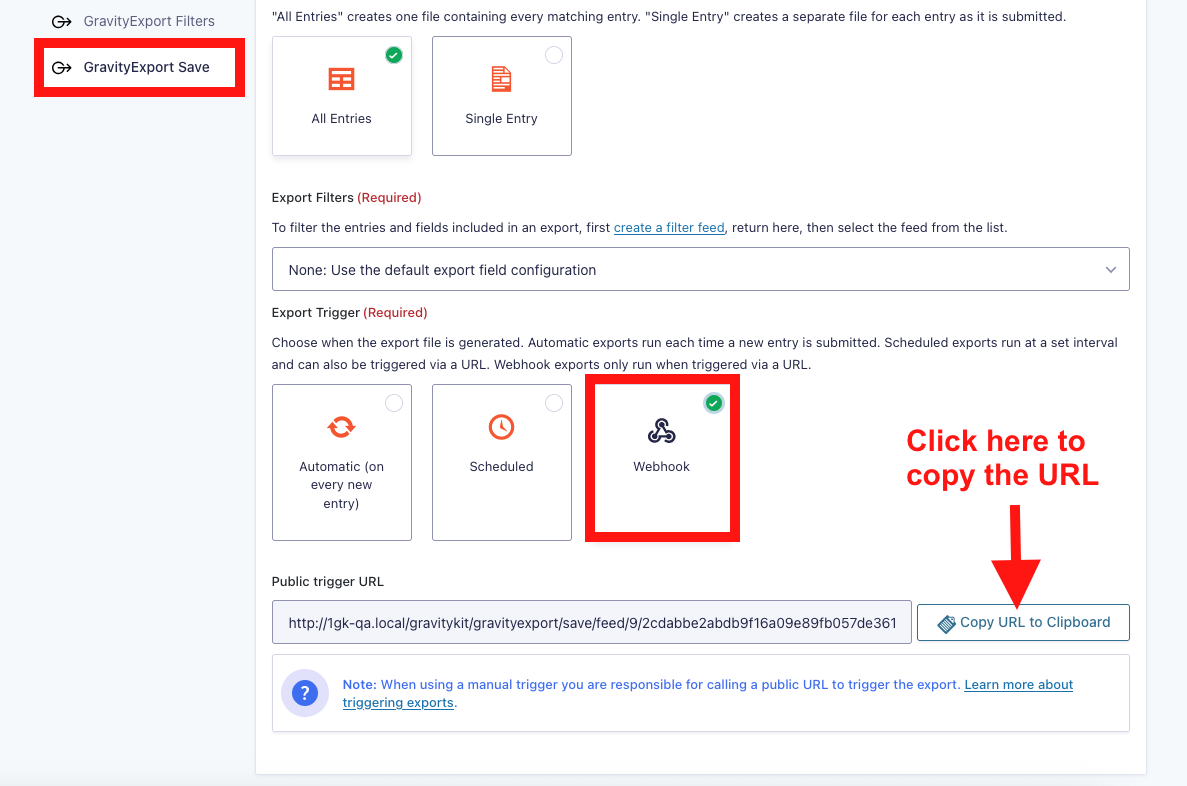
When creating a new "GravityExport Save" feed, choose an option under "Export Trigger":
- Scheduled — Runs automatically at a set interval (hourly, twice daily, daily, weekly, or a custom interval in hours). After saving, the feed settings will show when the next export is scheduled and the status of the last export.
- Webhook — Runs only when a public trigger URL is accessed. After saving the feed, a "Public trigger URL" will be generated. Click the button to copy it to your clipboard.
Scheduled exports also generate a trigger URL for on-demand use.
When the URL is accessed, the export will be run and the file will be saved, as you have configured.
Ways to trigger your export
Option 1: Schedule regular exports
Select the "Scheduled" trigger when configuring your feed, then choose an interval (hourly, twice daily, daily, weekly, or custom). Exports will run automatically in the background — no external services or plugins required.
You can monitor the next scheduled run and last export status directly in the feed settings. If a scheduled export fails, enable "Failure Alerts" to show a dashboard notice until the next successful export.
Ensuring scheduled exports run reliably
Scheduled exports use WordPress background processing (not WP-Cron), which checks for pending jobs on each page visit. This means scheduled exports will still work even if WP-Cron is disabled on your site.
To ensure exports run reliably, use an external service like FastCron (www.fastcron.com) to visit your site at regular intervals. These services send a request to your site on a schedule (e.g., every hour), which keeps WordPress background processing active. Simply point the service at your site's homepage, you do not need to use the export trigger URL for this.
Option 2: Trigger via Webhooks
Webhooks let you trigger exports automatically when something happens. No coding required with these tools:
Zapier (No-Code Automation)
Create a "Zap" to trigger exports when:
- A row is added to Google Sheets
- A payment is completed in Stripe
- An order is placed in WooCommerce
- Any of 5000+ app events occur
Setup:
- Choose your trigger event
- Add "Webhooks by Zapier" as the action
- Set it to GET request
- Paste your trigger URL
- Turn on the Zap
Make
Similar to Zapier with visual workflow builder:
- Select a trigger (form submission, schedule, etc.)
- Add HTTP "Make a request" module
- Enter your trigger URL
- Activate the scenario
Manual Use
Save the trigger URL as a browser bookmark to run the export anytime.
Common use cases
Daily reports
- Schedule a daily export using the "Scheduled" trigger with the "Daily" interval
- Automatically email or save to Dropbox using Zapier
After each submission
- Use Gravity Forms Webhooks Add-On
- Or create a Zapier workflow triggered by new entries
Weekly summaries
- Schedule regular exports using a weekly or custom interval
- Combine with email automation for distribution
On-demand exports
- Add bookmark for quick webhook exports
- Create Slack command for team access
Best practices
- Test your setup: Run the trigger URL manually first to ensure it works
- Monitor your exports: Check the feed settings for next run time and last export status
- Enable failure alerts: Turn on dashboard notifications so you're aware if a scheduled export fails
- Keep URLs secure: Don't share trigger URLs publicly
- Document your automations: Keep track of what triggers your exports
- Keep background processing active: If your site has low traffic, use an external service like FastCron to visit your site regularly so scheduled exports run on time