_1@2x.png)
How to enable logging and use WP Debug in GravityKit
Sometimes, our support team needs additional information to help figure out what is causing problems. GravityKit includes two logging systems to help with troubleshooting:
- GravityKit Logging (configurable log levels and outputs)
- WP Debug Logging (WordPress’ built-in debug log)
This guide explains how to use both.
GravityKit Logging
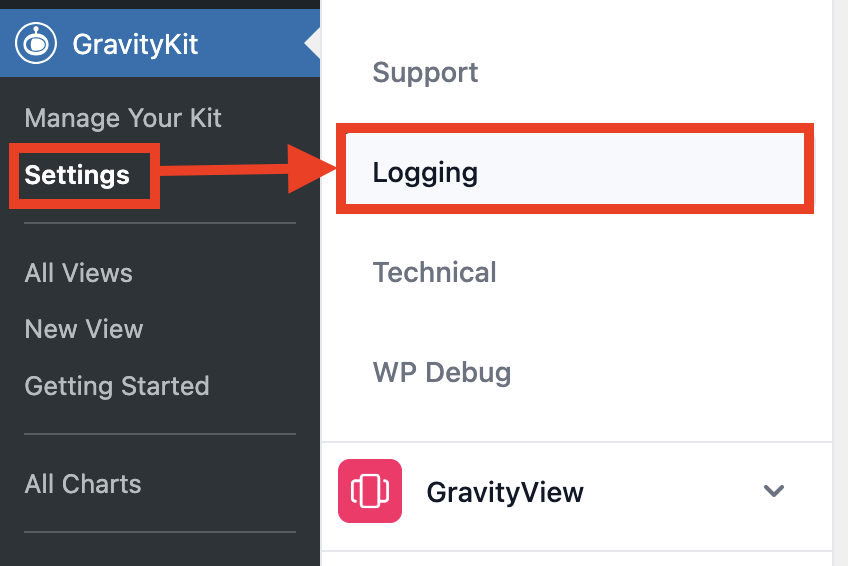
1. Open the logging settings
In your WordPress dashboard, go to GravityKit > Settings > Logging.
2. Enable logging
- Toggle the Enable Logging switch to On.
- Click Save Settings.

Note: If you turn logging Off (or switch from File to another log type), any existing log files will be deleted immediately. You may need to refresh the Settings page for the file links to disappear.
3. Choose a log level
This controls how much detail is captured. Different levels are suited for different environments:
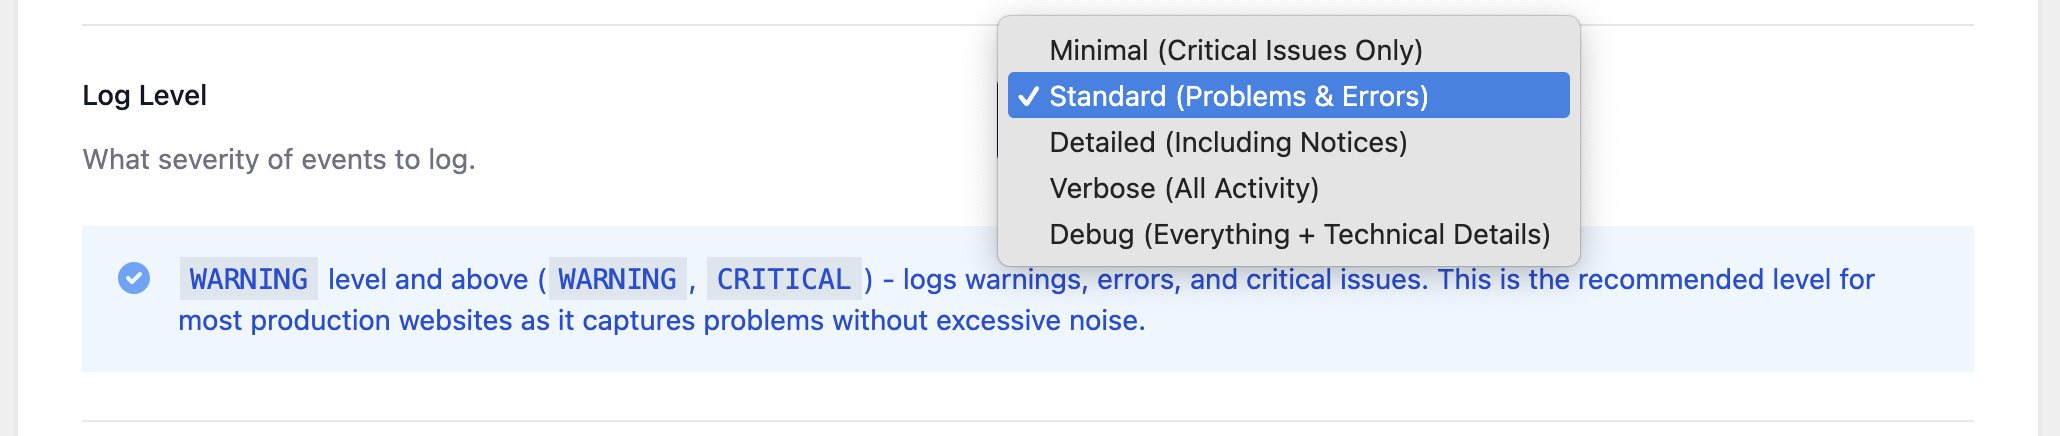
- Minimal (Critical issues only) – Logs only CRITICAL events, such as system crashes. Not recommended for most troubleshooting.
- Standard (Problems & errors) – Logs WARNING and CRITICAL events. Recommended for production sites.
- Detailed (Including notices) – Logs NOTICE, WARNING, and CRITICAL events. Useful for monitoring site health.
- Verbose (All activity) – Logs INFO and above. Includes general activity and system checks. May create large files.
- Debug (Everything + technical details) – Logs DEBUG and above, including function calls and queries. Use only temporarily, as it can impact performance.
Click Save settings after choosing a level.
4. Select a log type
Choose where to store logs:
- File – Saves logs to a file (default and easiest to share).
- Query Monitor – Sends logs to the Query Monitor plugin.
- Chrome Logger – Sends logs to the Chrome Logger extension.
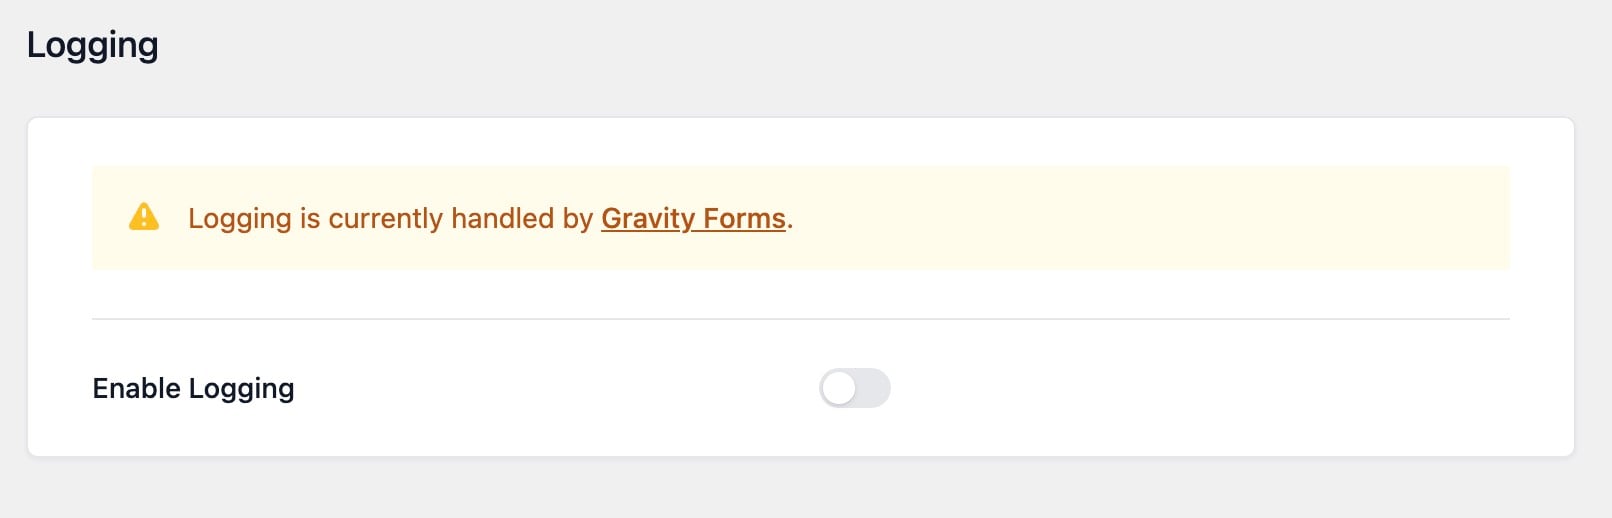
Note: Even if GravityKit logging is disabled, Gravity Forms logging (if enabled) will still run independently.
5. Configure log rotation
- Log cleanup schedule – Decide how often to start a new log file (Daily, Weekly, Monthly, Yearly).
- Number of log files to keep – Choose 3, 7, 14, 30, or Keep all. Older files will be deleted automatically if limits are set.
6. Reproduce the issue
If you’re troubleshooting, use GravityKit as normal and try to replicate the problem. Relevant log entries will be created.
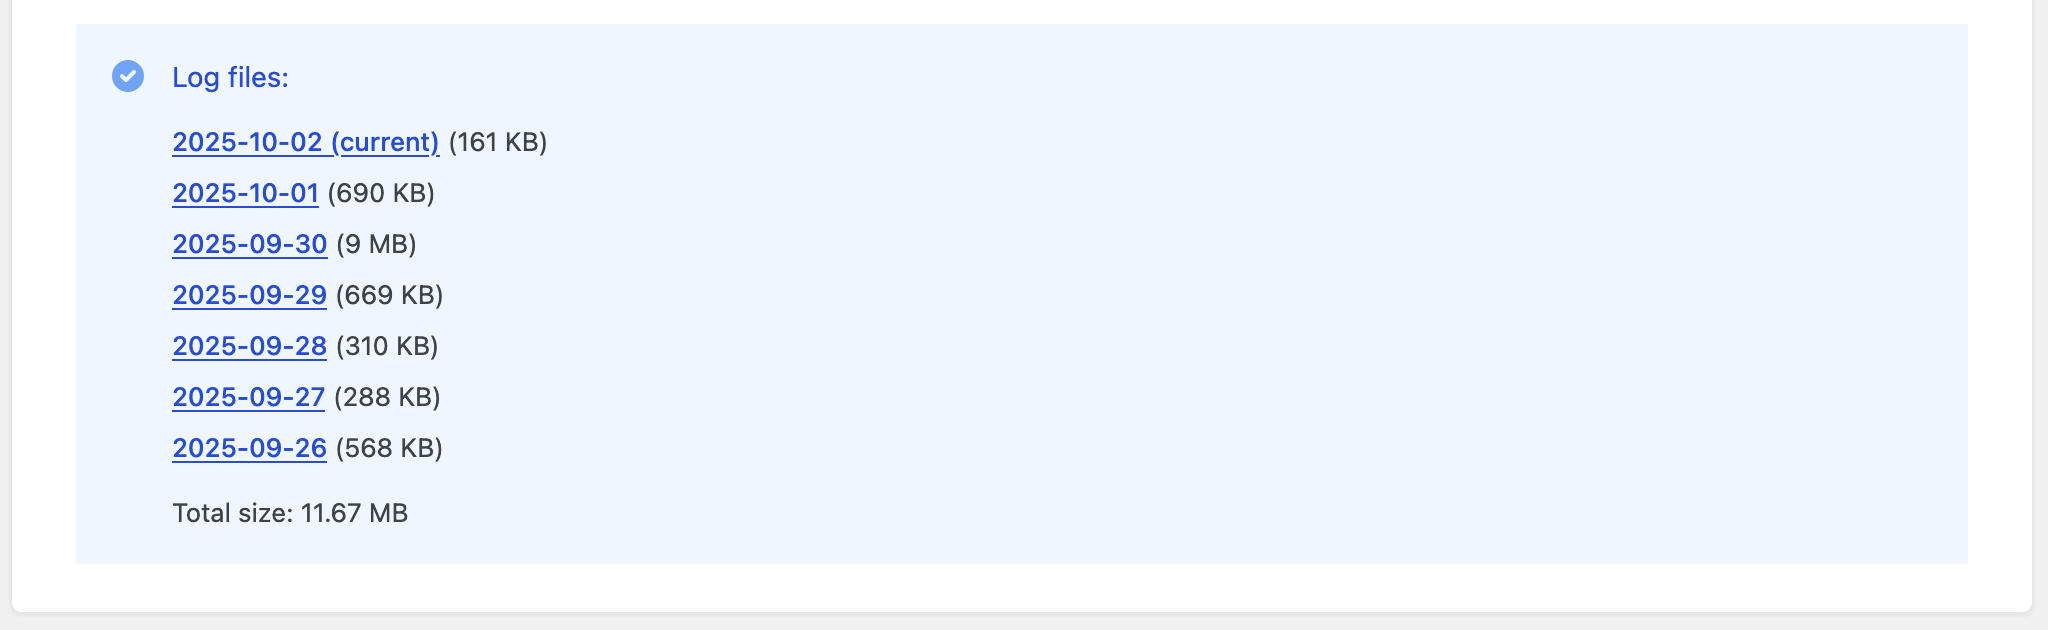
7. Download a log file
- Scroll to the Log files section.
- Locate the file by timestamp and size.
- Right-click the link and select:
- Safari: Download Linked File
- Firefox/Chrome: Save Link As…
Note: Links to log files are securely generated and can only be accessed by site administrators. Sharing the link with others will not work.
8. Send the log to support
-
Download the file and attach it to your support request so our team can help more effectively.
Tip: By default, logs (both GravityKit and WP Debug) are saved in the
wp-content/logsdirectory. Developers can change this location using thegk/foundation/logger/log-pathfilter.
WP Debug logging
In addition to GravityKit’s logs, you can also enable and download WordPress’ built-in debug log directly from GravityKit.
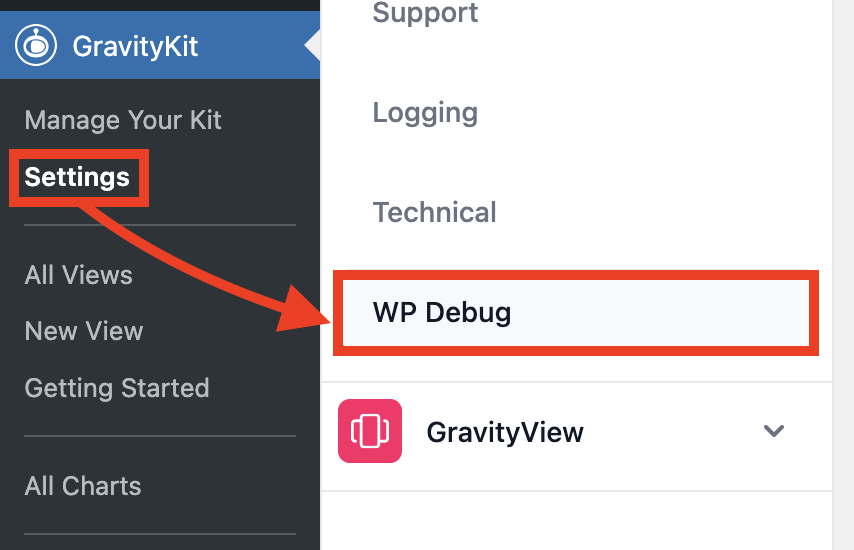
1. Open WP Debug settings
Go to GravityKit > Settings > WP Debug.
This tab appears if:
- The
GK_FOUNDATION_DEBUGconstant is defined, or - You have the
manage_optionscapability and appendwp_debug=1to the settings page URL.
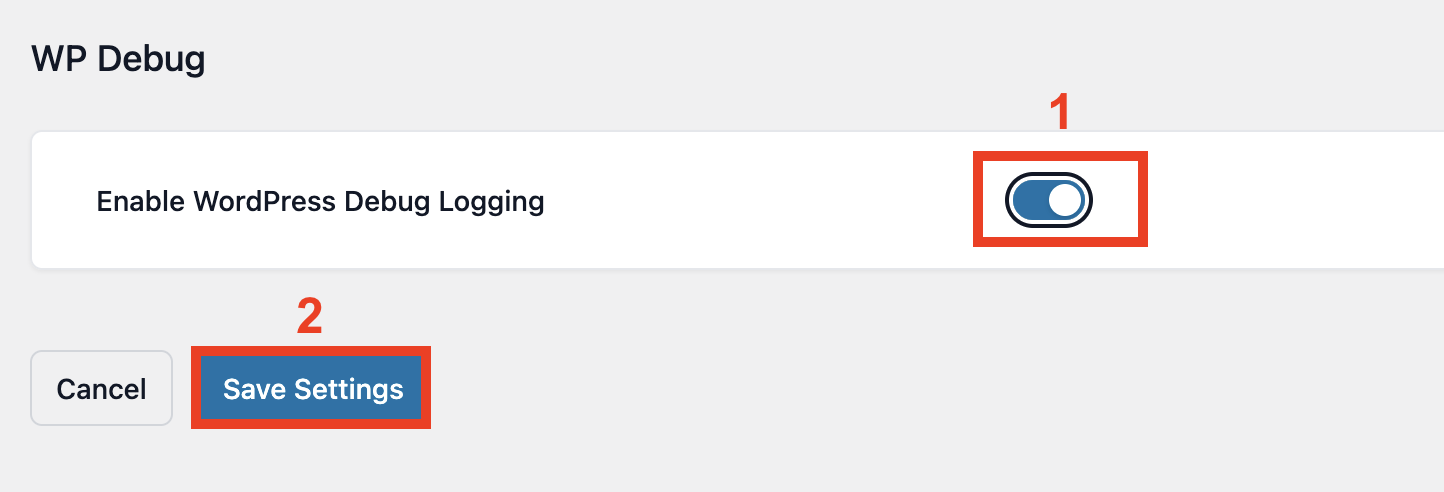
2) Enabling WP Debug
If debugging is disabled and your wp-config.php file is writable:
- Toggle Enable WordPress Debug Logging to On.
- Click Save settings
What happens:
- Any existing
WP_DEBUGandWP_DEBUG_LOGconstants are commented out. - GravityKit adds its own constants.
- A check confirms success. If unsuccessful, changes are rolled back automatically.
Note: On some sites, loopback requests may fail. To skip this check, add:
add_filter( 'gk/foundation/skip-site-health-check', '__return_true' );
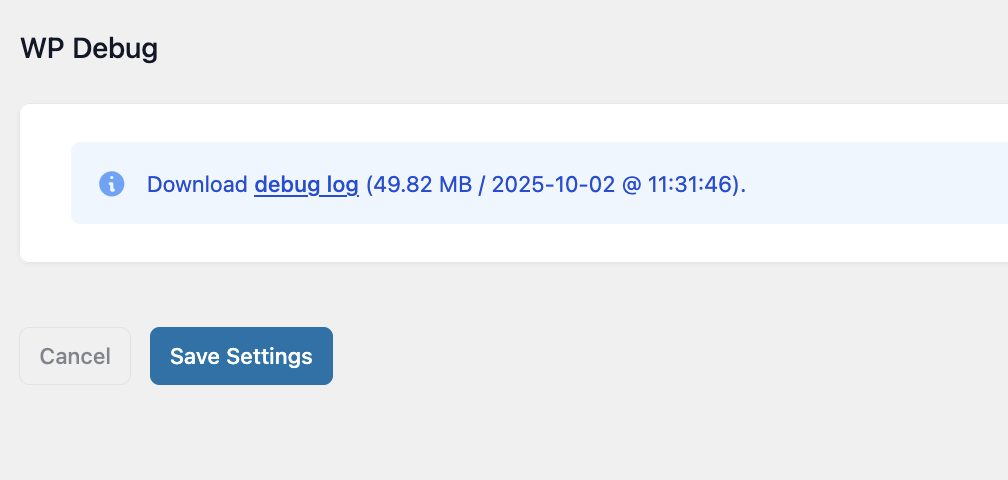
3. Download the debug log
If WP Debug is already enabled and a debug.log file exists:
- A secure download link will appear.
- The log records PHP notices, warnings, and errors generated by WordPress and plugins.
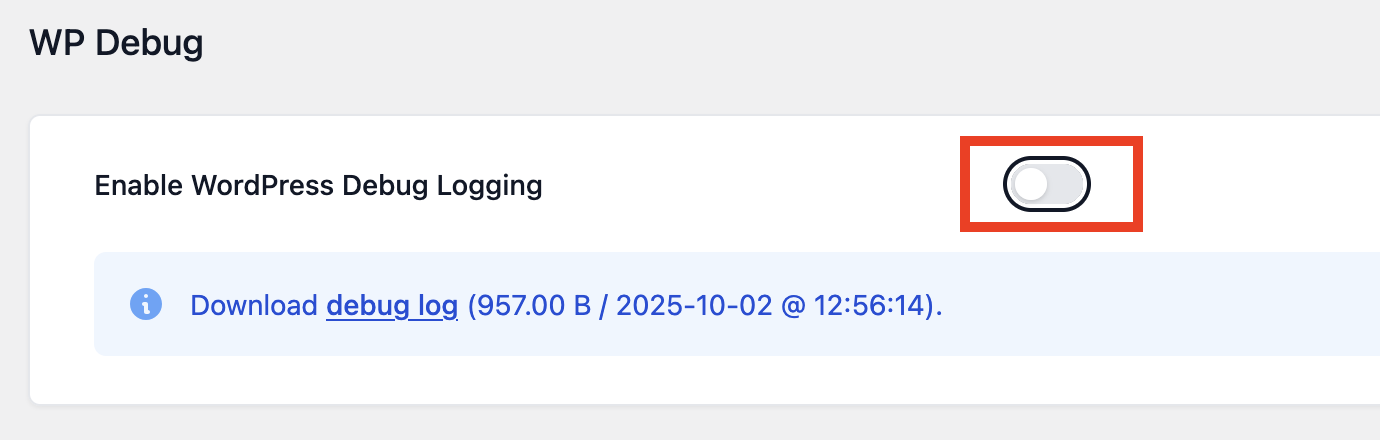
4. Disable WP Debug
- Toggle the setting Off and click Save settings.
- GravityKit will:
- Remove its custom constants
- Uncomment any
WP_DEBUGandWP_DEBUG_LOGentries it modified - Delete the custom debug log file
When to Use WP Debug
- Enable it temporarily to troubleshoot PHP issues (deprecated functions, warnings, fatal errors).
- Avoid leaving it enabled permanently on production sites, as logs can grow very large and may expose sensitive information.
With both GravityKit Logging and WP Debug, you have powerful tools to capture and share information with our support team, helping us diagnose and resolve issues more quickly.